
 English
 Deutsch
 Français
 Italiano
 Español
 Português
 日本語
日本語 Русский
The template file contains a small macro, designed to build the file structure that corresponds to your needs. To do so, it calls up a dialog box containing a number of questions for you to answer.
- Double-click the file to open it in Microsoft Excel.
- If an alert message appears about the macro, click the “Enable macros” button.
- Click the “Create the structure” button to run the macro.
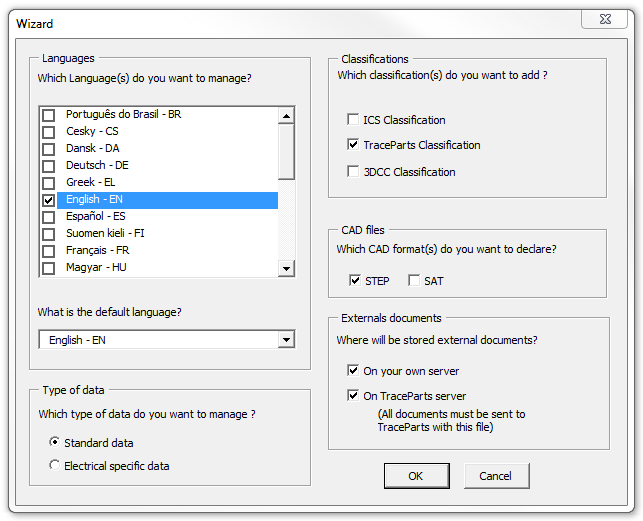
- The following dialog box appears on the screen. (If not, it must be because you disabled the macros, in which case see the Microsoft Excel documentation on how to re-enable macros.)
[accordion style=”normal” open=”no”][accordion_toggle title=”Languages section”]
From the list, select the languages for which you want to supply data.
- You must select at least one language
- You may select more than one
- The language code for each selected language will be marked in the “System” tab next to an attribute called “Selected_Language_Code”
Depending on what you select, a certain number of fields (columns) will be created for the data that needs to be translated, e.g. the part number description: one field per selected language for each data item.
These fields differ from other fields (those that contain non-translatable data) by the addition of a suffix consisting of a separator followed by a language code.
Example of a field name for the part number description in French and English:
- Part_Number_Description_FR (for French)
- Part_Number_Description_EN (for English)
Next, in the pull-down menu underneath the list, you need to select the “default language”
- This is required information.
- The list of languages available in the pull-down menu depends directly on which languages were selected earlier.
- The language code that corresponds to your selection will be marked in the attribute “Default_Language_Code” in the “System” tab.
[/accordion_toggle][/accordion]
[accordion style=”normal” open=”no”][accordion_toggle title=”CAD Files section”]
Check the box corresponding to the CAD file format for which you want to send us files.
This information is optional. If you don’t have a CAD file to send us, don’t check any of the boxes.
- Depending on which boxes you check, certain fields (columns) are created in the “Parts_Numbers” tab:
- “Part_Number_STEP_CAD_File”
- “Part_Number_SAT_CAD_File”
[/accordion_toggle][/accordion]
[accordion style=”normal” open=”no”][accordion_toggle title=”External documents section”]
If you have documents that relate to your parts, such as assembly instructions or dimensional sketches, you can declare them in the template file.
Start by specifying the maximum number of documents that you want to associate with each node in your classification.
- We offer two ways of managing these documents:
- Either you send us your documents, and we will host them on our server;
- Or, if your documents are already publicly accessible on your own server, simply send us the URL for each of the documents you want to reference.
-
- Depending on how you answer this question, certain fields will be created in the “Parts_Documents” tab:
- “Part_Family_Document_File_Name_xx” and “Part_Family_Document_File_Label_xx” if you send us your documents. “xx” corresponds to the code for the selected language;
- “Part_Family_Document_URL_xx” and “Part_Family_Document_URL_Label_xx” if you manage your documents at your own site. Again, “xx” corresponds to the code for the selected language.
Once you have answered all the questions, click “OK”.
The macro then creates several tabs containing various fields.
The generated file structure is described below.
Once the file structure has been generated, the macro cannot be used again.
[/accordion_toggle][/accordion]