
 Deutsch
 Français
 Italiano
 Español
 Português
 中文 (中国)
 日本語
日本語 Русский
You can, if you wish, transmit additional information about your products for the people who view your catalog.
The information you can transmit concerns the characteristics or “attributes” of your products.
An attribute is defined for a product. The values assigned to the attribute will be linked to your part number.
Templates are customized in two steps:
- The first step is to declare an attribute by supplying a definition in the “Attributes_Definition” tab so that the programs that will be processing the file recognize the element and know what to do with it;
- The second step is to declare the attribute in the “Products_XX” tab so that its values can be assigned.
Whatever the attribute type – dimensional or text – the template manages them in the same way. We will see, in the following examples, how to create different attributes. Before going any further, make sure you have fully understood the constraints on attribute identifiers.
The first step of the process is to declare attributes in the “Attributes_Definition” tab.
Take a screw, for example. Screws are characterized by two main dimensional attributes: diameter and length. We want to add this information for each part number on our screw in the “Products” tab.
The “diameter” attribute of the screw is identified as “D”; the “length” attribute is identified as “Lg”.
Screws are also characterized by their material attribute, so we also want to add this information for each part number of our screw. We will identify this material attribute as “MAT”. The key difference between the dimensional attributes and this material attribute is that the former have numeric values whereas the latter is a text attribute, and thus translatable.
- Scroll down the table to the first unused row.
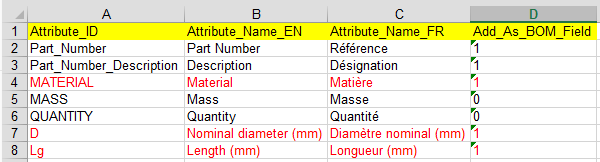
By default, if you have not yet added an attribute, the first empty row is row “4”. - In the first column, “Attribute_ID”, enter the identifier of the “diameter” attribute: “D”.
- The following columns, which start with “Attribute_Name”, can be used to assign a name to the attribute.
For example, suppose that with the wizard, you selected English and French; you therefore have 2 columns: “Attribute_Name_EN” and “Attribute_Name_FR”.
In the column “Attribute_Name_EN” you can specify the English name for the attribute, for example “Diameter D (mm)” (or just “D” if you prefer).
In the column “Attribute_Name_FR”, do likewise, but in French: “Diamètre D (mm)” (or just “D” if you prefer. Even if you already entered that for the English label, you have to enter it again for the French label).
Remember that it is always advisable to include, in the attribute label, the symbol for the units in which the attribute is measured. - Fill the “Add_As_BOM_Field” with “1” to allow the corresponding attribute to displayed to the users (in the example below, both “MASS” & “QUANTITY” fields won’t be displayed to the users)
- Repeat the procedure on the next row with the “length” attribute, identified as “Lg”
- Repeat the procedure on the next row with the “Screw Material” attribute, identified as “MAT”
- Important: Do not leave any blank rows in the table between attribute declarations.
- Example:
For the second step of the process, we move on to the “Products_XX” tab.
- Find the first unused column (where the first row of the column is empty).
- In the first row of this column, enter “D” – the identifier for the “diameter” attribute.
- Go to the next unused column.
- In the first row of this column, enter the identifier for the second attribute, “Lg”.
- These two new columns will be used to hold the values for the “diameter” attribute and the “length” attribute respectively.
- Go to the next unused column.
- In the first row of this column, enter the identifier for the third attribute, “MAT”.
- This new column will be used to hold the value for the “material” attribute.
- It only remains for you to complete the table by entering the diameter and the length of your screws against each individual part number. If you have selected more than one language in the wizard (as in our example), copy the attributes and values into each of your Products_XX tabs.
- Complete the table by entering the material of your screws against each individual part number. In this case, if you have selected more than one language in the wizard, you will need to translate the values of the attribute in each of your Products_XX tabs (see example below).
- Example (visble data are fictional)


As you progressively customize the file and add more attributes, some of the attributes will not be meaningful for certain products.
In this case, in the “Products_XX” tab, leave the cells of these attributes empty for those part numbers to which they do not apply.
These attributes will be ignored in the products that do not use them.
Conversely, some attributes may be found in several products of completely different types (the “color” attribute, for example).
In this case, no need to create a separate attribute for each product: you can use a single unique attribute (identified, for example, as “COLOR”) for all of the products.
Finally, bear in mind that you cannot have 2 identical identifiers in the same “Products_xx” tab.
So if, for the previous example, we had used a bearing rather than a screw, we might have declared 2 diameter attributes, one for the internal diameter, and one for the external diameter.
If we had done so, we couldn’t have identified them as “D” and “d”. The programs would assume they were dealing with the same identifier, as they don’t distinguish between upper and lower case.
The two attribute identifiers must therefore be distinct. For example, you might use “DIA_EXT” and “DIA_INT”.
There is no such concern when it comes to the attribute names: they can take the values “D” and “d”.
File structure > Customizing the template > Where will the data be displayed on the site?